I will be using Ubuntuserver in this guide. You can select whatever linux distro you prefer.
Download ubuntu server from https://ubuntu.com/download/server. Create a bootable USB drive using rufus or any other software(I prefer ventoy). Plug the usb on your computer, and select the usb drive from the boot menu and install ubuntu server. Follow the steps to install and configure ubuntu, and make sure to check “Install OpenSSH server”. Don’t install docker during the setup as the snap version is installed.
Once installation finishes you can now reboot and connect to your machine remotely using ssh.
ssh username@server-ip
# username you selected during installation
# Type ip a to find out the ip address of your server. Will be present against device like **enp4s0** prefixed with 192.168.
Create the directories for audiobooks, books, movies, music and tv.
I keep all my media at ~/server/media. If you will be using multiple drives you can look up how to mount drives.
We will be using hardlinks so once the torrents are downloaded they are linked to media directory as well as torrents directory without using double storage space. Read up the trash-guides to have a better understanding.
mkdir ~/server
mkdir ~/server/media # Media directory
mkdir ~/server/torrents # Torrents

# Creating the directories for torrents
cd ~/server/torrents
mkdir audiobooks  books  incomplete  movies  music  tv

cd ~/server/media
mkdir audiobooks  books  movies  music  tv
Jackett is where you define all your torrent indexers. All the *arr apps use the tornzab feed provided by jackett to search torrents.
There is now an *arr app called prowlarr that is meant to be the replacement for jackett. But the flaresolverr(used for auto solving captchas) support was added very recently and doesn’t work that well as compared to jackett, so I am still sticking with jackett for meantime. You can instead use prowlarr if none of your indexers use captcha.
Sonarr is a TV show scheduling and searching download program. It will take a list of shows you enjoy, search via Jackett, and add them to the qbittorrent downloads queue.
I personally only use jellyfin because it’s completely free. I still have plex installed because overseerr which is used to request movies and tv shows require plex. But that’s the only role plex has in my setup.
I will talk about the devices section later on.
For the media volume you only need to provide access to the /data/media directory instead of /data as jellyfin doesn’t need to know about the torrents.
As I mentioned in the jellyfin section there is a section in the conmpose file as “devices”. It is used for transcoding. If you don’t include that section, whenever transcoding happens it will only use CPU. In order to utilise your gpu the devices must be passed on to the container.
The default username is admin and password adminadmin. You can change the user and password by going to Tools → Options → WebUI
Change “Default Save Path” in WebUI section to /data/torrents/ and “Keep incomplete torrents in” to /data/torrents/incomplete/
Create categories by right clicking on sidebar under category. Type category as TV and path as tv. Path needs to be same as the folder you created to store your media. Similarly for movies type Movies as category and path as movies. This will enable to automatically move the media to its correct folder.
Sonarr
Navigate to YOUR_SERVER_IP:8989
Under “Download Clients” add qbittorrent. Enter the host as YOUR_SERVER_IP port as **8080,** and the username and password you used for qbittorrent. In category type TV (or whatever you selected as categoryname(not path) on qbittorent). Test the connection and then save.
Under indexers, for each indexer you added in Jackett
Click on add button
Select Torzab
Copy the tornzab feed for the indexer from jackett
Copy the api key from jackett
Select the categories you want
Test and save
Under general, define the root folder as /data/media/tv
Repeat this process for Radarr, Lidarr and readarr.
Use /data/media/movies as root for Radarr and so on.
The setup for ombi/overseerr is super simple. Just hit the url and follow the on screen instructions.
Bazarr
Navigate to YOUR_SERVER_IP:6767
Go to settings and then sonarr. Enter the host as YOUR_SERVER_IP port as 8989. Copy the api key from sonarr settings→general.
Similarly for radarr, enter the host as YOUR_SERVER_IP port as 7878. Copy the api key from radarr settings→general.
Jellyfin
Go to YOUR_SERVER_IP:8096
Add all the libraries by selecting content type and then giving a name for that library. Select the particular library location from /data/media. Repeat this for movies, tv, music, books and audiobooks.
Go to dashboard→playback, and enable transcoding by selecting as VAAPI and enter the device as /dev/dri/renderD128
Monitor GPU usage while playing content using
sudo intel_gpu_top
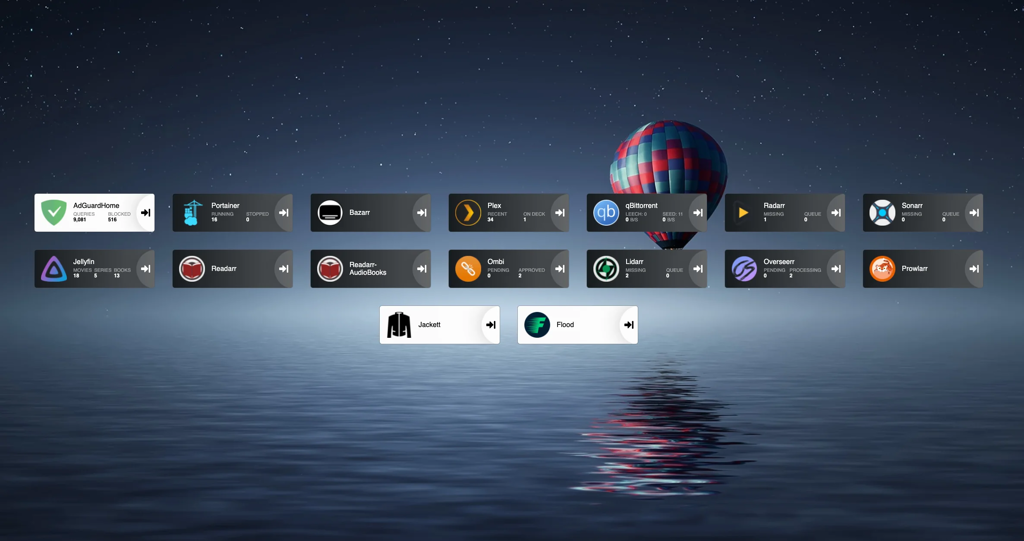
Heimdall
Navigate to YOUR_SERVER_IP:8090
Setup all the services you use so you don’t need to remember the ports like I showed in the first screenshot.
Updating docker images
With docker compose updates are very easy.
Navigate to the compose file directory ~/server/compose/media-server.
Then docker-compose pull to download the latest images.
And finally docker-compose up -d to use the latest images.
Remove old images by docker system prune -a
What’s next
You can setup VPN if torrents are blocked by your ISP/Country. I wanted to keep this guide simple and I don’t use VPN for my server, so I have left out the VPN part.
You can read about port forwarding to access your server over the internet.
Hm, maybe that was purely for TrueCharts. If so, that’s my bad. However, after moving to Prowlarr I’d say it is much nicer and tends to be more reliable for my use case.
There is now an *arr app called prowlarr that is meant to be the replacement for jackett. But the flaresolverr(used for auto solving captchas) support was added very recently and doesn’t work that well as compared to jackett, so I am still sticking with jackett for meantime. You can instead use prowlarr if none of your indexers use captcha.
I found heimdall unreliable and not very lightweight. Considering I essentially just wanted bookmarks it made more sense to switch to an app similar to homepage.
You could do it, especially if you’re running Truenas Scale since that’s Linux. On Core you could do it inside a VM (I have Jellyfin set up inside an Ubuntu VM with persistent samba mounts to access my media).
On Scale the recommended way would probably be through helm charts, though config might look a bit different than the Docker Compose files here. There are charts for I think all the services mentioned: https://truecharts.org/charts/description_list
Personally I’m planning on waiting just a little bit longer for Scale to become more stable and then I’m going to migrate, rather than trying to set up all these services in a VM on my Core machine today.
Yeah this stuff just confuses the shit out of me but I definitely don’t want any telemetry on my server and I don’t trust canonical anymore. TrueNAS is the one I was planning to use but I’m hoping for something comprehensive.
So what I could use is something that hase like phases… phase 1 being just ripping your own to whatever and being able to watch that on your tv… then other bite-sized phases. Some of us have kids lol. We don’t get hours at a time.
the hyphened “docker-compose” cmd is deprecated and does not receive updates anymore. Use “docker compose” (as in a subcommand of the docker cli) instead. You might docker compose files that the old thing refuses.
As an FYI to anyone trying this, I ran into the following problems and solved them.
Port 53 (DNS) was already bound to systemd-resolved. This caused the Adguard container to fail.
https://hub.docker.com/r/adguard/adguardhome
From their documentation, do this. I added the commands I did below.
sudo mkdir /etc/systemd/resolved.conf.d
sudo touch /etc/systemd/resolved.conf.d/adguardhome.conf
sudo nano /etc/systemd/resolved.conf.d/adguardhome.conf
#Copy this in and save
[Resolve]
DNS=127.0.0.1
DNSStubListener=no
DHCP on the interface I was using on my VM was already bound to DHCP. To resolve this, set a static IP. I used the following.
sudo nano /etc/netplan/00-installer-config.yaml
#Overwrite with the following. Make sure if your adapter isn’'t labeled ens33, you change it appropriately.
network:
renderer: networkd
ethernets:
ens33:
addresses:
- 192.168.1.200/24
nameservers:
addresses: [192.168.1.1]
routes:
- to: default
via: 192.168.1.1
version: 2
When I try to run "sudo nano /etc/systemd/resolved.conf.d/adguardhome.conf " it opens up GNU nano 7.2 and tells me at the bottom of the screen that the file is actually a directory and refuses to let me copy/paste anything into it.
EDIT: Looks like the issue for me is with nano. It’s trying to make this a directory instead of a file. I’m able to get it working with vi. If anyone is haveing the same issue, you have to delete the “file” you made with nano, then make a new one with vi before it’ll work.
That being said, the last portion regarding the DHCP conflict also isn’t working, probably due to the formatting not being specified.
EDIT2: Looks like the real issue for fixing port DNS port 68 (the DHCP conflict) is a bit more complicated. There’s multiple different possibilities for what the file you need to modify can be named.
Personally, the solution I’m going with is to just disable port 68 for adguard. According to this source, the only downside is having your router handle DHCP, which I’m fine with at the moment. The source I posted refers to port 67, but it works for port 68 as well.
If anyone reading this would prefer to let Adguard use port 68 by setting up a static IP address, This guide is more detailed and also includes some of the variances in filenames you might come across to better solve the problem for your setup.
Hey so I know this is really old but I have been running my adguard home on a raspi for a while now but am trying to move it over to run with everthing else. The only problem is that whenever I set the “DNSStubListener=no” it breaks all the API things for homepage and overseerr/tautuli etc do you know of a way to fix?
I know one or both changed their name and idk if theyre even still around but makes me think of wefwef and mlem for lemmy what cringy fucking names. I know the name isnt a huge deal if the software is good but for one second can we not sound exactly as cringy as a people imagine us lol
Nice guide! However, I’ve always wondered if all of these even make sense. Like, can’t you just stream from the internet? I understand having thing on your physical storage device is an extra degree of freedom but it’s very rare for me watching something more then once. Also while you can technically run it off a Raspberry Pi, it’s not really recommended and you would need a separate PC which just adds to the cost. Meanwhile, with a simple app like Cloudstream, you can just get whatever you want whenever you want. The only advantage I see of the *arr +media server approach is not needing to connect to a VPN.
EDIT: After reading the replys just realized I should have specified by streaming sites I mean the shady ones, in my country we use different words and I see how that can confuse some people
Personally I just think it’s easier to pick out the movies and shows I want to watch, and then be sure that they will be there once I sit down to watch them. No uncertainty, no hunting down a good stream or missing episode, everything is just there and ready. The process is very simple once everything is set up, and you can still delete video files after you watch them if you want to.
The nature of pirating means that specific media/torrents/indexes/domains are frequently down or unavailable. A solution today might be taken down or raided by authorities tomorrow.
It’s just a little more stable/redundant to have media stored locally. Plus, by streaming from something like cloud stream, you’re not contributing to torrent seeding, not to mention that a turnkey solution is a large target for authorities, so it’s possible if not likely that it’ll stop working someday and you’ll have to find something else.
It’s not for everyone certainly, but if you can afford it it’s a nice solution.
It’s all about use case. You don’t rewatch shows or movies, so maybe storing media isn’t for you. I’m often rewatching or just having background stuff playing, so it’s nice having it available.
On top of that, I was tired of streaming services removing content. Netflix removing It’s Always Sunny actually got me started, and the subsequent removal of episodes from shows confirmed I made the right choice. I actually have control over my media, in that I can put a playlist of any number of shows together I want.
I have playlists for 70’s-80’s shows like The Brady Bunch, The A-Team, Knight Rider, just hit shuffle and it’s 1,000 episodes of random nostalgia. I can set up programs like DizqueTV and set up my own TV channels on top of this. Why pick and choose a show when TV can pick for me?
In regards to “the hardware” I ran my Plex server on a Pi3 for years. Unless you’re pushing 4k content or certain filetypes, the Pi is more than enough.
In addition to all this, I’m not reliant on my internet. If power goes out partially, I still have access to my hard drives and have always been able to pop on a show or movie while I clean up in the dark. Or sometimes the internet just goes out and it’s really nice being unaffected.
I think it’s been 7 or 8 years since I started in college, I’ve spent about $600 total on hard drives that I’m still using today? The money I’ve spent is invested into my server, rather than paying some service for something I can do myself. A service that has to submit to the will of the government, I was curious of the price range of Cloudstream and saw that they took the site and code down, so it’s just another streaming situation that’s no different, except the chance of payment being sent to the actual people who worked on the show is now completely gone. Even just $30/month after 5 years is $1,800.
I pirate content because I can’t trust Netflix/Hulu/Disney to not fuck with their content. So why would I pay another 3rd party to do the same thing? Moreover, when I subscribe to these streaming services I can contribute to the metrics to say, “Hey, I want more It’s Always Sunny after S14!”.
Finally - it’s a hobby as well. I like computers. Linux another the shit out of me but I’ve enjoyed setting up a server used for more than just media. On the Pi I would just search for what I wanted and add it as I see fit. Obviously, there’s the *arrs as well which can get it all automated for you. That’s a bit of setup on its own, but it’s fairly straightforward.
You will probably not reach the level of quality with something like a pirate hoster.
Either the content will have a lower bitrate or lower resolution.
Foreign dub is hard to come by in decent quality.
Yes storage and compute is surely more expensive but for some it’s a hobby and a learning experience
not discrediting you, this is just my point of view.
Media being removed is in not really a problem on streaming sites since there’s usually many where you can watch the same thing, and as for point 4 streaming sites are basically the same.
I guess it’s just different usage because I don’t really like rewatching things and my family doesn’t usually watch movies/TV series.
So in the end the only thing I don’t like with how I do it is not being able to physically have the files
EDIT: I just realized I should have specified by streaming sites I mean the shady ones, in my country we use different words
You are not logged in. However you can subscribe from another Fediverse account, for example Lemmy or Mastodon. To do this, paste the following into the search field of your instance: !piracy@lemmy.dbzer0.com
⚓ Dedicated to the discussion of digital piracy, including ethical problems and legal advancements.


Awesome guide! I will say, Jackett isn’t maintained anymore so you should probably be recommending Prowlarr instead.
Jackett GitHub shows activity in the last day, so I’m not sure where you got the idea that it wasn’t maintained.
Hm, maybe that was purely for TrueCharts. If so, that’s my bad. However, after moving to Prowlarr I’d say it is much nicer and tends to be more reliable for my use case.
From main post
👏 👏 👏 👏 👏 👏 👏 👏 👏 👏 👏
everything goes somewhere, and i go everywhere.
This is a freaking great guide. I wish I had this wonderful resource when I started selfhosting. Thanks for this.
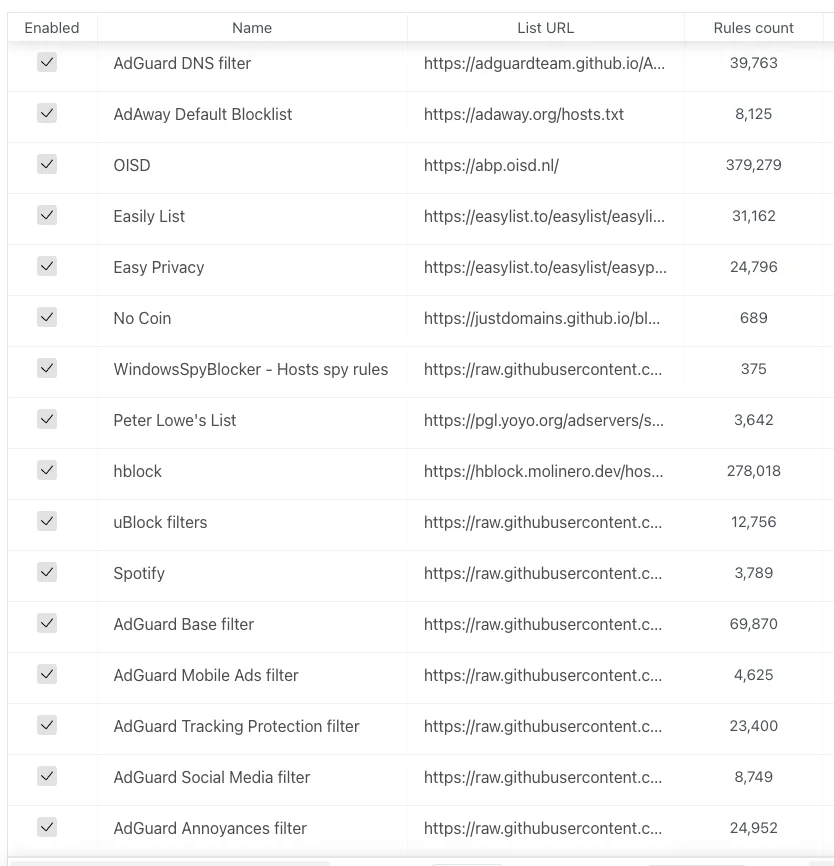
People might also want to have a look at pihole as an alternative to adguard for add blocking. It is awesome.
I prefer homepage over heimdall. It is more configurable, but less noob friendly.
Jellyseer is a fork of overseer that integrates very well with jellyfin. Reiveer is promising for discovering and adding content.
The code base in reiverr is beautiful and svelte kit is amazing.
Seconded.
I found heimdall unreliable and not very lightweight. Considering I essentially just wanted bookmarks it made more sense to switch to an app similar to homepage.
Is there a guide for using something other than Ubuntu? Is TrueNAS a suitable alternative?
You could do it, especially if you’re running Truenas Scale since that’s Linux. On Core you could do it inside a VM (I have Jellyfin set up inside an Ubuntu VM with persistent samba mounts to access my media).
On Scale the recommended way would probably be through helm charts, though config might look a bit different than the Docker Compose files here. There are charts for I think all the services mentioned: https://truecharts.org/charts/description_list
Personally I’m planning on waiting just a little bit longer for Scale to become more stable and then I’m going to migrate, rather than trying to set up all these services in a VM on my Core machine today.
Yeah this stuff just confuses the shit out of me but I definitely don’t want any telemetry on my server and I don’t trust canonical anymore. TrueNAS is the one I was planning to use but I’m hoping for something comprehensive.
So what I could use is something that hase like phases… phase 1 being just ripping your own to whatever and being able to watch that on your tv… then other bite-sized phases. Some of us have kids lol. We don’t get hours at a time.
Damn dude, saving this shit! Thanks for writing this up!
the hyphened “docker-compose” cmd is deprecated and does not receive updates anymore. Use “docker compose” (as in a subcommand of the docker cli) instead. You might docker compose files that the old thing refuses.
Yup I figured this out yesterday just started trying this guide I was sitting there like am I slow… Where I mess up lmao.
As an FYI to anyone trying this, I ran into the following problems and solved them.
sudo mkdir /etc/systemd/resolved.conf.d sudo touch /etc/systemd/resolved.conf.d/adguardhome.conf sudo nano /etc/systemd/resolved.conf.d/adguardhome.conf #Copy this in and save [Resolve] DNS=127.0.0.1 DNSStubListener=no
#Overwrite with the following. Make sure if your adapter isn’'t labeled ens33, you change it appropriately. network: renderer: networkd ethernets: ens33: addresses: - 192.168.1.200/24 nameservers: addresses: [192.168.1.1] routes: - to: default via: 192.168.1.1 version: 2
When I try to run "sudo nano /etc/systemd/resolved.conf.d/adguardhome.conf " it opens up GNU nano 7.2 and tells me at the bottom of the screen that the file is actually a directory and refuses to let me copy/paste anything into it.
EDIT: Looks like the issue for me is with nano. It’s trying to make this a directory instead of a file. I’m able to get it working with vi. If anyone is haveing the same issue, you have to delete the “file” you made with nano, then make a new one with vi before it’ll work.
That being said, the last portion regarding the DHCP conflict also isn’t working, probably due to the formatting not being specified.
EDIT2: Looks like the real issue for fixing port DNS port 68 (the DHCP conflict) is a bit more complicated. There’s multiple different possibilities for what the file you need to modify can be named.
Personally, the solution I’m going with is to just disable port 68 for adguard. According to this source, the only downside is having your router handle DHCP, which I’m fine with at the moment. The source I posted refers to port 67, but it works for port 68 as well.
If anyone reading this would prefer to let Adguard use port 68 by setting up a static IP address, This guide is more detailed and also includes some of the variances in filenames you might come across to better solve the problem for your setup.
Hey so I know this is really old but I have been running my adguard home on a raspi for a while now but am trying to move it over to run with everthing else. The only problem is that whenever I set the “DNSStubListener=no” it breaks all the API things for homepage and overseerr/tautuli etc do you know of a way to fix?
I’ll need to take a closer look at this later.
I have a raspberry pi chilling on the desk. I should try this items.
Saving for later, this is the way everyone, try to be more like this legend.
I tried a few days ago but
I couldn’t have docker containers on a separate drive
And I couldn’t get Jellyfin to attach to my port through docker. The logs didn’t show anything was going wrong though
Did you try again?
I have it running outside of docker; I’ll eventually try again but I had people mad that they couldn’t watch their shows as I migrated from plex
Keep trying please
There really isn’t a single good name in this entire area of software. Just a massive cringefest.
Half of this stuff is like widely loved and open source. What is so cringe
The names of stuff. They’re weird to him. That’s the issue he’s having. Basically a complete lack of self awareness.
Funny coming from the person saying ‘cringe.’
I know one or both changed their name and idk if theyre even still around but makes me think of wefwef and mlem for lemmy what cringy fucking names. I know the name isnt a huge deal if the software is good but for one second can we not sound exactly as cringy as a people imagine us lol
Yes, wefwef got the memo and changed its name to Voyager. Maybe it’s an age issue - most pirates are young.
Nice guide! However, I’ve always wondered if all of these even make sense. Like, can’t you just stream from the internet? I understand having thing on your physical storage device is an extra degree of freedom but it’s very rare for me watching something more then once. Also while you can technically run it off a Raspberry Pi, it’s not really recommended and you would need a separate PC which just adds to the cost. Meanwhile, with a simple app like Cloudstream, you can just get whatever you want whenever you want. The only advantage I see of the *arr +media server approach is not needing to connect to a VPN.
EDIT: After reading the replys just realized I should have specified by streaming sites I mean the shady ones, in my country we use different words and I see how that can confuse some people
Personally I just think it’s easier to pick out the movies and shows I want to watch, and then be sure that they will be there once I sit down to watch them. No uncertainty, no hunting down a good stream or missing episode, everything is just there and ready. The process is very simple once everything is set up, and you can still delete video files after you watch them if you want to.
The nature of pirating means that specific media/torrents/indexes/domains are frequently down or unavailable. A solution today might be taken down or raided by authorities tomorrow.
It’s just a little more stable/redundant to have media stored locally. Plus, by streaming from something like cloud stream, you’re not contributing to torrent seeding, not to mention that a turnkey solution is a large target for authorities, so it’s possible if not likely that it’ll stop working someday and you’ll have to find something else.
It’s not for everyone certainly, but if you can afford it it’s a nice solution.
I meant free streaming sites with reuploads, but the other point still stand strong, thanks
It’s all about use case. You don’t rewatch shows or movies, so maybe storing media isn’t for you. I’m often rewatching or just having background stuff playing, so it’s nice having it available.
On top of that, I was tired of streaming services removing content. Netflix removing It’s Always Sunny actually got me started, and the subsequent removal of episodes from shows confirmed I made the right choice. I actually have control over my media, in that I can put a playlist of any number of shows together I want.
I have playlists for 70’s-80’s shows like The Brady Bunch, The A-Team, Knight Rider, just hit shuffle and it’s 1,000 episodes of random nostalgia. I can set up programs like DizqueTV and set up my own TV channels on top of this. Why pick and choose a show when TV can pick for me?
In regards to “the hardware” I ran my Plex server on a Pi3 for years. Unless you’re pushing 4k content or certain filetypes, the Pi is more than enough.
In addition to all this, I’m not reliant on my internet. If power goes out partially, I still have access to my hard drives and have always been able to pop on a show or movie while I clean up in the dark. Or sometimes the internet just goes out and it’s really nice being unaffected.
I think it’s been 7 or 8 years since I started in college, I’ve spent about $600 total on hard drives that I’m still using today? The money I’ve spent is invested into my server, rather than paying some service for something I can do myself. A service that has to submit to the will of the government, I was curious of the price range of Cloudstream and saw that they took the site and code down, so it’s just another streaming situation that’s no different, except the chance of payment being sent to the actual people who worked on the show is now completely gone. Even just $30/month after 5 years is $1,800.
I pirate content because I can’t trust Netflix/Hulu/Disney to not fuck with their content. So why would I pay another 3rd party to do the same thing? Moreover, when I subscribe to these streaming services I can contribute to the metrics to say, “Hey, I want more It’s Always Sunny after S14!”.
Finally - it’s a hobby as well. I like computers. Linux another the shit out of me but I’ve enjoyed setting up a server used for more than just media. On the Pi I would just search for what I wanted and add it as I see fit. Obviously, there’s the *arrs as well which can get it all automated for you. That’s a bit of setup on its own, but it’s fairly straightforward.
Either the content will have a lower bitrate or lower resolution.
I used to be in your camp, but then switched to plex setup etc.
Main reasons:
I’m seeing the trend of media being removed from people and I’m getting sick of it. I want my shit to be mine and available to me at a moments notice.
My collection basically exists if all top movies / shows that I can rotate watching.
It makes it so that my tech illiterate family can enjoy everything too without knowing how anything works.
I could cancel all those greedy corporate assholes splitting everything into a thousand services.
not discrediting you, this is just my point of view. Media being removed is in not really a problem on streaming sites since there’s usually many where you can watch the same thing, and as for point 4 streaming sites are basically the same.
I guess it’s just different usage because I don’t really like rewatching things and my family doesn’t usually watch movies/TV series.
So in the end the only thing I don’t like with how I do it is not being able to physically have the files
EDIT: I just realized I should have specified by streaming sites I mean the shady ones, in my country we use different words