• 1 Post
  • 34 Comments
Joined 1Y ago
cake
Cake day: Jul 01, 2023

help-circle
rss

If the only tool you have is a hammer, everything looks like a nail.

That’s the only thing I can think to answer your question. There are some problems that are best solved with other tools, like text parsing for example you might want to call out to some code written in a functional language.


Awesome, gonna bookmark those for later. Thanks!


No problem. The one I used is an ESP32 DevKitC, and you can find info about it on Espressif’s site, or just google the pinout diagram. For basic tasks it should be all you need since it has lots of binary pins, two ADC channels, two DAC channels, realtime clock, special pins for waking it from deep sleep, two I2C, etc. Though if you want to do video input you probably want something else, I’m learning.

Anyway, if you can spare the money to get one just to toy with I’d definitely recommend it.


Okay so that is an issue with the ESP32, sure. There are a lot of variants.

So from what I can tell, the ESP32 is the SoC chip and what you usually get is a dev board which has that plus a bunch of power regulation bits, a USB connector and UART so you can easily program it, etc. That part varies mostly by pinout. I.e. Same features, different pin location.

There are also variants of the chip, but those are usually more costly and will be named things like ESP32-S2.

Every one I’ve seen can run off 5v or 3.3v and uses the latter for logic, so if you got yourself an arduino kit and then just bought an ESP32 dev board it would almost certainly work with whatever is in the kit. Both are microcontrollers, not microprocessors, so they tend not to have OSes or screens.


Oh interesting. Can you link the detector? I could use that for something else.


When you put mail in the box, unless it’s a REALLY small bit of mail it’ll land so it obscures at least one of the proximity sensors. This then sets the ‘got mail’ statue to ‘on’ in Home Assistant. From there, I have HA set up to send me notifications to go and check the mail.

Before you say so, yes this was a lot of work for something so trivial, but it was fun. Plus I actually get so little physical mail that I can forget to check the mailbox for weeks at a time. Which would be very bad if I got some actually important mail. And actually, that exact thing happened just days after I finished installing the thing. So it has already potentially saved me from a fine.


I’m sorry to say I don’t. :/ You can grab dev boards off aliexpress for cheap, and they’re really easy to play with. Just connect the to your PC via USB to load your initial ESPHome script, and they spring to life. From there you can do basic testing, since they’ll get power from the USB. It’s just a matter of what you decide you want to hook up to them after that. I assume you’re looking for like a hobby kit, like you can get for arduino boards? Something that comes with a bunch of LEDs and I2C components you can fiddle with? Unfortunately I don’t know of any that come with ESP32 dev boards, but I’ll admit I’ve not looked. Sorry.


I built a smart mailbox
cross-posted from: https://lemmy.world/post/15565311 > It was a long running project, but I finally did it. I built what I'm calling a smart mailbox that communicates the presence of mail locally with Home Assistant via ESPHome. > > Parts: > - Pine plank roughly the width of my mailbox > - Treated pine plank for mounting > - Thin sheet of perspex or similar transparent plastic > - 2x [VCNL4010 proximity sensor](https://www.aliexpress.com/item/1005005450411501.html) > - [ESP32 dev board with antenna](https://www.aliexpress.com/item/1005001438925793.html) > - [Bigger antenna](https://www.aliexpress.com/item/1005006208040822.html) > - [Prototype board](https://www.aliexpress.com/item/1005004818919331.html) > - [2.54mm pitch JST connectors](https://www.aliexpress.com/item/1005003667406240.html) > - [2.54mm pitch pin header sockets](https://www.aliexpress.com/item/4001198421663.html) > - 18650 battery > - [18650 Type-C charging module](https://www.aliexpress.com/item/32786777105.html) > - Battery holder > - 2x [5V 1.5W solar panels](https://www.aliexpress.com/item/33019015032.html) > - [MCP1700-3302E LDO regulator](https://www.aliexpress.com/item/1005001608339185.html) > - [100uF electrolytic capacitor](https://www.aliexpress.com/item/1005005691916127.html) > - [100nF ceramic capacitor](https://www.aliexpress.com/item/32973259342.html) > - Resistors... I think I ended up using a 1 MOhm and a 330 kOhm > - [Weatherproof junction box](https://www.bunnings.com.au/deta-211mm-weatherproof-junction-box-ip56_p4330860) > - [Nylon screw spacers](https://www.aliexpress.com/item/32862529967.html) > - [Cable glands](https://www.aliexpress.com/item/1005006211622214.html) > - [12mm waterproof button](https://www.aliexpress.com/item/4001362443186.html) > - Various cables and wires > - Paint and polyurethane spray to weatherproof the wood > > Tools: > - Soldering iron > - Router for cutting grooves in wood > - Drill and hole saw bits > - Various files and sandpaper > > For a start, I followed [this guide](https://randomnerdtutorials.com/power-esp32-esp8266-solar-panels-battery-level-monitoring/) to get me started on the power delivery portion, but I ended up using much higher valued resistors since I found that I was losing more battery charge through the voltage divider than I was from the ESP32 or proximity sensors. > > Once I'd tested the concept with the parts just laying in a jumble on the table, it was time to get to work. > > I started by cutting a plank of pine to fit my mailbox, chamfering the ends to make space for the metal joins. I routed out some spaces for the tops of the bolts that hold the mailbox down. > > ![](https://cdn.imgchest.com/files/myd5cmzx664.jpg) > > Measured out where the sensors should go, along with a surrounding space to screw down some little perspex windows to cover them. The idea I wanted was for the mail to be able to slide over the sensors without getting caught on them, as well as to protect them from dust. > > ![](https://cdn.imgchest.com/files/3yrgc9kw2l4.jpg) > > Routed out the dents and cleaned them up with a chisel and sandpaper. Cut the perspex to shape for a test fit. > > ![](https://cdn.imgchest.com/files/l7lxcxgw8b7.jpg) > > On the other side, I routed out a notch for the cable to access the sensors. > > ![](https://cdn.imgchest.com/files/84jdc6wr5q4.jpg) > > I had originally planned to just solder wires into the sensors, but then I realised JST connectors would fit perfectly into the sensors. This meant I had to widen the holes somewhat, which I did with a small chisel and file. > > ![](https://cdn.imgchest.com/files/pyq9cv5prk4.jpg) > > I got a bit lazy with making screw holes to hold down the perspex, so they're not in as neat a place as I'd like. If I did this again I'd measure properly for their placement. Still, with countersinking they hold down the perspex well and nothing sticks up for mail to get caught on. > > ![](https://cdn.imgchest.com/files/myd5cmzxve4.jpg) > > I also got started on making a housing for the solar panels. I used the router to carve out a 1-2mm area for them to sit in, and a much deeper ditch linking the two terminals, which you'll see in a later picture. For now, here's how they look sitting in it. > > ![](https://cdn.imgchest.com/files/3yrgc9kwlr4.jpg) > ![](https://cdn.imgchest.com/files/j7mmcnwlkz7.jpg) > > Wiring up the prototype board was next. Again, see the article I linked above for how this works. I used pin headers to allow the ESP32 dev board to be slotted in and out, just in case I ever needed to take it out for replacement or reprogramming. Also the JSTs on the prototype board are for connecting the battery (top left), connecting the solar panels (bottom left), providing power to the sensors (bottom right) and clock and data lines for the sensors (top right). Since the sensors are both using the same I2C bus address and cannot be configured otherwise, I had to run two clock and data lines, but if I'd found sensors that could have different addresses I could have just used one of each. I didn't take a photo of the board at this stage, but I later added another header to connect a button to reset the ESP32 from the outside. > > ![](https://cdn.imgchest.com/files/k739cknol57.jpg) > > I also made the data and power cable for the sensor board. > > ![](https://cdn.imgchest.com/files/b49zcvgp59y.jpg) > > The solar panel housing and 'sensor plate' were both painted and treated with polyurethane spray to protect them from rain and humidity. > > ![](https://cdn.imgchest.com/files/w7w6cqmg8my.jpg) > ![](https://cdn.imgchest.com/files/wye3cgpjkw4.jpg) > > I drilled holes in the weatherproof box to fix the cable glands and the weatherproof button. In the case of the solar panel wire, I had opted to buy speaker wire since I figured it would be easier to run in the channel between the two solar panels, being flat. But that also made it not really fit the cable glands that great. I ended up stripping some of the outer sheath off some 2 wire power cable I had, and wrapping that around the part of the speaker wire that gets clamped in the glands, just to make a reasonable seal. These all were on the side I decided I would mount at the bottom, so water wouldn't be able to easily fall into the box. > > ![](https://cdn.imgchest.com/files/g4z9c98n2n7.jpg) > > Final test fit. I later used epoxy glue to glue down the nylon headers and the battery holder inside the box. > > ![](https://cdn.imgchest.com/files/e4gdcmvlb84.jpg) > > The mailbox itself also needed a hole in the bottom for the sensor cable to come out. After drilling a hole and filing it into a square shape, I cut some rubber grommet strip to size and fitted it around the hole, with some marine silicone adhesive to protect the sharp metal edges from water and to hold the grommet strip in place. > > ![](https://cdn.imgchest.com/files/my8xcqlwr34.jpg) > > I'd drilled some holes in the brick wall my mailbox sits upon for masonry anchors, and this piece of treated pine got the last of my polyurethane spray, just in case. > > ![](https://cdn.imgchest.com/files/345xc8kgo37.jpg) > > Using a two pieces of the leftover perspex glued together, I made an internal mount for the antenna, figuring it would be best to not have the thing either floating around freely inside the box or sticking out the side where people could potentially break it off. > > ![](https://cdn.imgchest.com/files/84apcvdkmo4.jpg) > ![](https://cdn.imgchest.com/files/k46acga56z7.jpg) > > Finally, after weeks of off and on work, it was ready to install. > > ![](https://cdn.imgchest.com/files/pyvdcnbeldy.jpg) > ![](https://cdn.imgchest.com/files/6yxkcqjmlq7.jpg) > > The ESPHome coding used [my VCNL4010 component](https://github.com/dixonte/esphome-vcnl4010), and if anyone is interested I can share it but it's kinda a large file.
fedilink

This is true, but compared to the prevailing alternative I’ll take it. Unless there’s a viable FOSS alternative for whatever software we’re talking about at the time, of course. :P


I know vlans is the answer, but I don’t know how to set it up. I really need to do this with my own network some day. There must be an OPNsense guide for this, I know it…


LetsEncrypt can hand out wildcard certs if you are able to add TXT records to your domain, if that helps any.

I realised this was a stupid comment that doesn’t help any.


The BS in the last comment aside, what about the meme needs moderating? Was it a repost, or is the argument it makes unacceptable on reddit’s piracy board?


I just noticed lemmy didn’t like the #include statement because it uses angle brackets. I tried to update it but it doesn’t look right, so I’m going to change it to quotes which should work the same, I believe. I’m not a C expert, I usually code in C#.


Here’s the code I wrote:

#include "Keyboard.h"

const char FUNCTION_F14 = 0xF1;
int down = 0;

void setup() {
  // make pin 2 an input and turn on the
  // pullup resistor so it goes high unless
  // connected to ground:
  pinMode(2, INPUT_PULLUP);
  // initialize control over the keyboard:
  Keyboard.begin();
}

void loop() {
  int nowDown = digitalRead(2) == LOW;

  if (down != nowDown) {
    down = nowDown;

    if (down) {
      Keyboard.press(FUNCTION_F14);
    } else {
      Keyboard.release(FUNCTION_F14);
    }
  }
}

Note that the #include was meant to use angle brackets, but Lemmy ate them. If this doesn’t work, change it back to angle brackets around the Keyboard.h instead of quotes.

Also, the parts I used:

I wired it up like in the photo, and just laid it on a bed of hot glue so the USB port sticks out the hole. I had intended to get a mini USB extension cable inside the pedal, but the one I ordered turned up defective, and this worked out just fine.
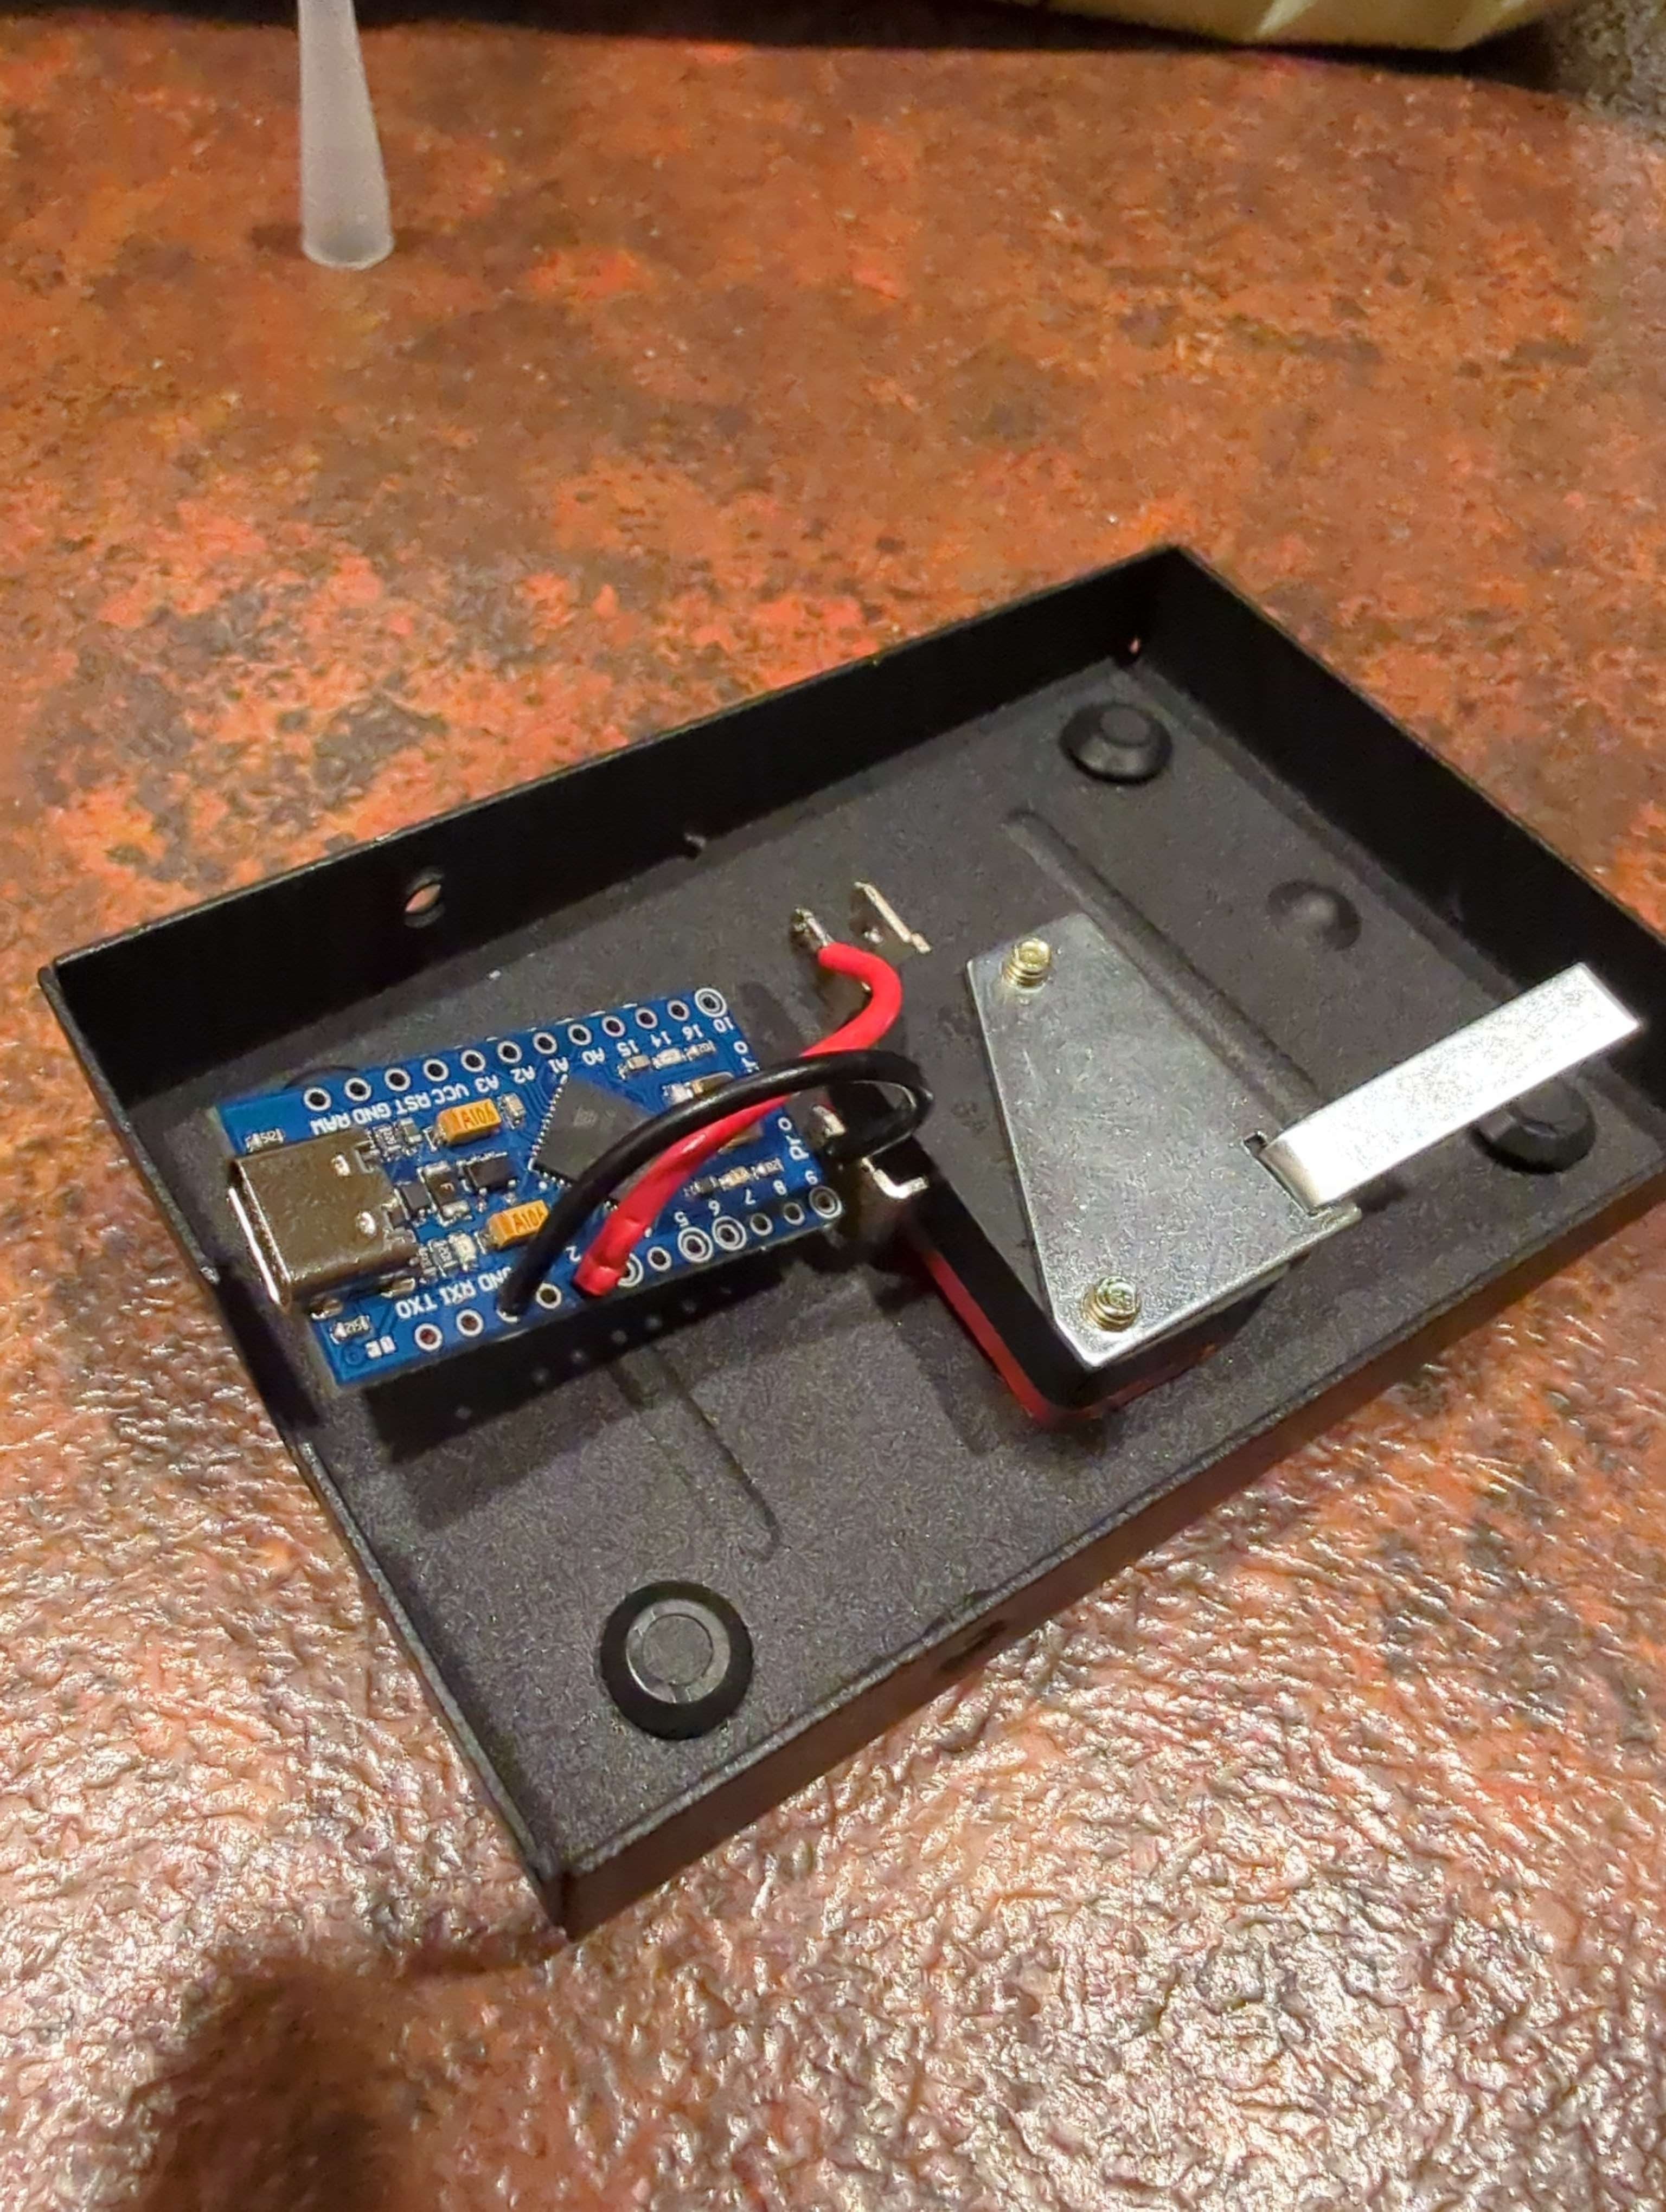

I bought an existing foot pedal off aliexpress. It came with a little dangling wire, supposedly meant to be hooked up to a piece of industrial equipment. Opened it up, removed the existing wire, soldered a wire to a suitable arduino dev board and hot glued it inside. If you want I can dig up the exact parts I used and even the code. But I also suspect maybe you want to figure it out yourself?


I built myself a foot pedal that presses F14. It’s super useful as a global hotkey 'cause nothing else uses it. :P


I dunno what you guys are doing that makes your nextcloud die without touching it. Mine runs happily until I decide to update it, and that usually goes fine, too. I don’t use docker for it, tho.


Man I remember when API applied almost exclusively to integrating with software on the same machine, makes me feel old…


Whatever works for you. I use C# for work so if there’s something I need to do that’s more complex than I know to do in bash I’ll just use that.


MS SQL Server has this thing called Replication. It’s a feature to keep tables in sync between databases, and even database servers. There’s merge replication (two way), snapshot replication (one way scheduled publishing), and transaction replication (one way live-ish publishing).

And the logic is all implemented in T-SQL stored procedures.

I fucking hate it.


Keepass fIle in my own nextcloud instances, synced to my phone so I can also use keepass2android. This way if something happens I at least have another copy of it, beyond my backup system.


1 is truthy, but not the exact same thing as true, and the distinction can be important.


I was specifically thinking of circular event handler references, which I know was a thing at some point in the past. If .Net has improved since then, great.


Circular references can also impede garbage collection, don’t forget.

And to further clarify, a proper object wrapping a resource like the ones you listed will release them when it is eventually collected, in the finalizer/destructor. However, you can’t know when that will happen, so we have IDisposable.Dispose() which can be used to release whatever critical resources the object is holding right away. :)


Okay that is a bit rougher. Best of luck I suppose. Hopefully you can lean on your colleagues somewhat. If I had one piece of advice, look up the using block, it basically ensures an object gets disposed immediately when it goes out of scope, which is the closest C# lets you get to deallocating memory. The object needs to implement IDisposable tho.


If you can code in C++ you should be able to muddle through in C# no problem. The runtime will help prevent the worst SNAFUs; y’know, pointer errors (there are none, unless you use the unsafe block or p/invoke), memory leaks etc. Just look at the existing code and cargo-cult it til you make it. You got this. :)


It’s for people who have two PCs, a regular one and a server of some kind (old parts PC, Raspberry PI or similar, etc). Who don’t want to leave their main PC on all the time and want to download large files that take days to download.


I just run HAOS on the hardware, yeah. Have considered making it a container on my main home server, but I have the RPi and I just want my home assistant to work. My home server is more of a tinker project so it’s nice to keep them separate.


Sounds super weird to me. I haven’t had any problems at all, but I run it on a RPi rather than a VM.


Hey, I hate php AND javascript, and I’ve worked in both of them. :P